4.4版本前,使用的是Dalvik虚拟机
5.0版本以后,使用的是Art虚拟机
Dalvik虚拟机
原理
Dalvik是基于寄存器的虚拟机,读取和保存数据会比基于栈的JVM在运行时快很多
基于寄存器的虚拟机允许更快的执行时间,但代价是编译后的程序更大
新的Dex字节码格式
合并多个class字节码文件
减少常量池大小
减少文件的IO操作,提高类的查找速度
减少文件大小
dex的优化格式odex
在App安装的过程中,会通过Socket向/system/bin/install进程发送dex_opt的指令,对Dex文件进行优化
在DexClassLoader动态加载Dex文件时,也会进行Dex的优化
Dalvik的JIT
在运行时对dex的指令进行intercept,解释成机器码
虚拟机根据函数调用的次数,来决定热点代码
以函数为维度将热点代码的机器码进行缓存,在下一次调用时直接调用该机器码
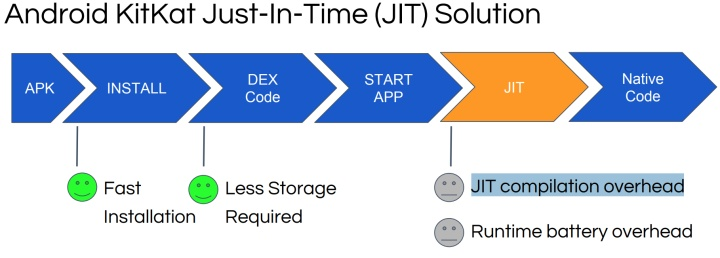
KitKat的JIT
优点与缺点
优点
安装速度超快
存储空间小
缺点
Multidex加载的时候会非常慢,因为在dex加载时会进行dexopt
JIT中需要解释器,解释器解释的字节码会带来CPU和时间的消耗
由于热点代码的Monitor一直在运行,也会带来电量的损耗
5.0-7.0的Art虚拟机
在5.0-7.0(Android N)之间,Android提出了ART虚拟机的概念,而运行的文件格式也从odex转换成了oat格式。
原理
在APK安装的时候,PackageManagerService会调用dex2oat通过静态编译的方式,来将所有的dex文件(包括Multidex)编译oat文件。
编译完后的oat其实是一个标准的ELF文件,只是相对于普通的ELF文件多加了oat data section以及oat exec section这两个段而已。 这两个段里面主要保存了两种信息: Dex的文件信息以及类信息Dex文件编译之后的机器码
在运行的时候,就直接运行oat的代码。而其中的Dex文件的内容也就是为了DexClassLoader在动态加载其他的Dex文件时,在链接的过程中可以找到对应的meta-data,正确的链接到引用的类文件与函数。

优点与缺点
优点
运行时会超级快
在运行时省电,也节省各种资源
缺点
在系统更新的时候,所有app都需要进行dex2oat的操作,耗费的时间太长
在app安装的过程中,所耗费的时间也越来越长,因为apk包越来越大
由于oat文件中包含dex文件与编译后的Native Code,导致占用空间也越来越大
7.0至今的Art虚拟机
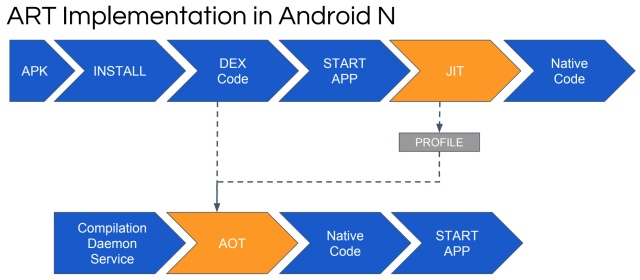
由于上述的缺点,7.0之后的采用了Hybrid Mode的ART虚拟机:
解释器
JIT
OAT
将这三种方案进行混合编译,来从运行时的性能、存储、安装、加载时间进行平衡。 在第一次启动的时候,系统会以Intercept的方式来运行App,同时启动Compilation Daemon Service在系统空闲的时候会在后台对App进行AOT静态编译,并且会根据JIT运行时所收集的运行时函数调用的信息生成的Profile文件来进行参考 。 而根据Profile生成AOT的过程就是:Profile Guided AOT 而在JIT的过程中会进行以下事情:
JIT的解释器:将字节码解释成机器指令
JIT的编译器:将函数编译成机器指令
根据运行时的环境生成Profile文件,以供AOT编译时生成机器码
Android N的ART模式
JIT的解释器
对字节码进行解释
基于计算的跳转指令
基于Arm汇编的Operation Code处理
Profiling以及JIT编译的触发
基于函数执行次数以及搜索式的代码热度
JIT代码缓存
管理编译过的缓存代码
为Hot Methods分配
ProfilingInfo对象
JIT的编译器
函数粒度的编译
后台编译
避免Block App的UI线程
基于ART优化的编译器
使用和AOT一样的编译器
在优化编译器中会增强JIT的编译能力
生成Profile文件
使用单独的ProfileSaver线程
生成Profile文件
读取根据Hot Methods生成ProfilingInfo
把ProfilingInfo写到磁盘文件中
最低的消耗
减少Wakeup的次数
写入最少的信息
使用混编模式的原因
- 部分用户只使用APP的部分功能。而且这些经常使用的功能是值得被编译成Native Code的
- 使用JIT阶段找出来经常使用的代码
- 使用AOT编译以及优化来提升经常使用的这些功能
- 避免为了一些不常用的代码而付出资源(编译、存储等等)
混编模式的实现
- 在JIT的过程中,生成Offline的Profile
- Offline Profile的文件格式
- 使用AOT增强过后的编译器(dex2oat)
- 编译所使用的Daemon Service
- 只在充电或者系统IDLE的情况下才会进行AOT编译
Profile文件会在JIT运行的过程中生成:
- 每个APP都会有自己的Profile文件
- 保存在App本身的Local Storage中
- Profile会保存所调用的类以及函数的Index
- 通过profman工具进行分析生成
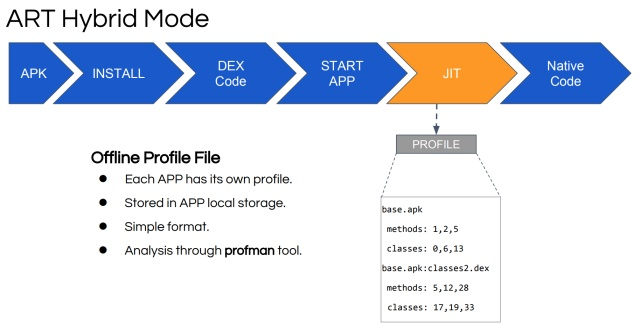
Offline Profile
而在BackgroundDexOptService中,会根据JIT运行时所生成的Profile以及Dex文件在后台进行AOT,根据运行时的Profile文件会选择性的将常用的函数编译成NativeCode

Profile Guided AOT
而整个JIT的工作流如下:
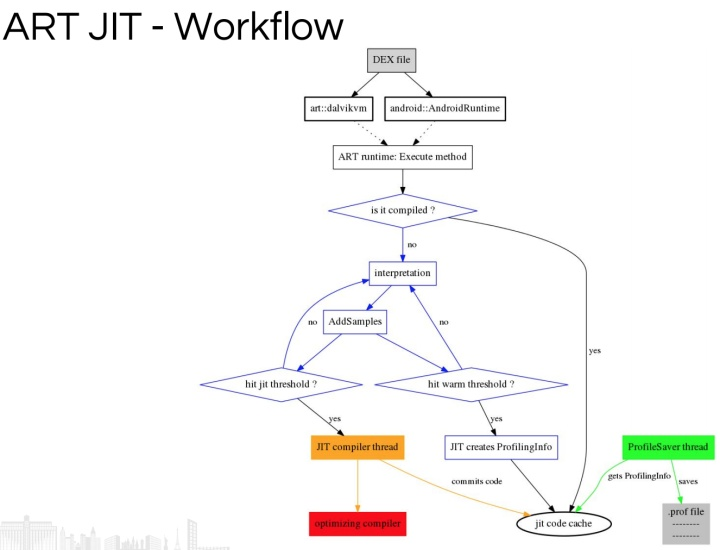
JIT细节
1. ART vs Dalvik 涉及的各类文件
开始之前,简单介绍下ART和Dalvik。
我们知道 java是运行在java虚拟机JVM上,所以JAVA代码可移植性比较强。
Android是可以运行java代码的,所以其应该有一个Jvm虚拟机或者说实现了一个自己的Jvm虚拟机。而Dalvik就是最初的Android平台上的Jvm实现,用以使得Android上能够运行java代码。
1.1 java .class文件
我们写出的java代码是 .java 文件,而运行在 Jvm上之前,我们会先对 java文件进行编译。
比如: javac Hello.java ,会将 java代码编译成 java bytecode,放在生成的一个名称为Hello.class的文件,在Jvm运行Hello程序的时候,会装载并解释 Hello.class文件中的 java bytecode进行执行;
java文件对于 java bytecode的关系,可以大概类比 C文件和汇编指令的关系。每一个java方法都是由多条 java bytecode 组成的。
需要注意的是,java文件中的每个类都会被编译成一个 .class文件。
比如,Test.java 内容如下:
class Test {
  public static void main(String[] args) {

  }

  class InnerClass {

  }//class Innerclass
}// class Test
运行 javac Test.java 命令,编译完成后,会生成 “Test.class” 和 “Test$InnerClass.class” 两个 .class文件;每个类对应一个。
简单来讲: ==JVM 执行 .class文件,识别 .class 中的 java bytecode并执行==
.class文件及java bytecode的分析:
按照上面的步骤, javac Hello.java 生成的 .class文件可以用来分析,可以使用 010editor工具 进行分析 .class文件的文件结构。
可以使用 javap 命令把 .class文件生成 java bytecode进行分析(具体使用方法 javap -help)。
java bytecode大约有几十个,可以参考:https://en.wikipedia.org/wiki/Java_bytecode_instruction_listings
1.2 dex文件
dex 应该解释为: dalvik executable.
sdk有个工具dex,用来把 1.1节中讲到的 .class文件“打包”成 dex文件,这里用“打包”这个词的意思是:
把所有 javac 编译生成的 .class文件,打包成 classes.dex文件。
优化操作:
“打包”过程,存在优化操作,比如CassA和ClassB中都有一个字符串“Hello World!”,则ClassA和ClassB被打包到的同一个 classes.dex文件中,只存在一个字符串。这是打包过程中,其中的一个“优化”。
java bytecode转换为 dalvik byte code:
打包过程中,会把 .class文件中的所有 java bytecode 转换为 dalvik bytecode,因为 dalvik只能识别 dalvik bytecode,并执行它们.
简单来讲: ==Dalvik 执行 .dex文件,识别 .dex中的 dalvik bytecode并执行==
.dex文件及dalvik bytecode的分析:
解压一个apk文件,获取 classes.dex文件,同样可以使用 010editor进行分析学习。
可以使用 dexdump 分析dex文件(具体使用方法: dexdump 不加任何参数,会打印出help信息)。
dalvik bytecode 可以参考: http://source.android.com/devices/tech/dalvik/dalvik-bytecode.html
JIT(Just In Time):
本节需要简单了解下JIT。
我们知道,C/C++ 的效率要比 Java好,因为C/C++会被直接编译成汇编指令,CPU可以直接读取运行;而Java却是需要虚拟机一步一步的解释每一条 java bytecode。
而Dalvik 中使用了一个技术,叫做JIT,会在解释执行一个java方法或者一个java代码段时,进行trace,并在不断的执行过程中找到 hotspot,
然后将相应的方法或者代码片段编译为对应的汇编指令,下次再执行到该方法时,会直接执行其对应的汇编指令,依次来提升部分效率。
可以理解为:运行时追踪,并对hotspot进行编译生成高效的可执行指令。
1.3 oat文件
前面1.1和1.2两节,简单介绍了 JVM 和Dalvik VM,总得来讲,两句话: ==JVM执行 java 字节码, Dalvik执行 dalvik 字节码。==
ART(Android Runtime),是Android4.4上开始提供的另一个 JVM实现,在4.4时,默认的虚拟机还是 dalvik,ART作为可选项,到Android5.0,开始作为Android默认的虚拟机。
同样的,ART也支持运行 dalvik bytecode(否则没有办法兼容之前的app),另外 ART 提出了一个 AOT(Ahead of time)的方法。
这个 AOT就是相对于 1.2节中提到的 JIT, AOT是说在代码运行之前进行编译。即把dex文件中的 dalvik bytecode编译为处理器可识别执行的汇编指令,我们把编译后生成的代码称为Native code。
而OAT文件就是包含了dex文件,dex文件编译出的 native Code,以及OAT header,OAT class等组织文件的数据。
在使用oat文件的时候,通过这些组织关系,来查找一个类中java函数对应的 native code,从而在执行时去运行 native code;
实际上app编译出来的OAT文件是一种特殊的ELF文件,在这个ELF文件的 oatdata 和 oatlastword之间的数据为oat数据。也即 oat文件数据时嵌入在ELF文件中的。
ART运行的时候,会查询当前app对应的 oat文件进行执行,当找不到oat文件时再解释dex的 bytecode 执行。
简单来讲:==ART执行 oat文件,执行其中 java 函数对应 native code; 当函数没有对应的native code或者app没有对应的oat文件时,仍然解释执行dex文件中其对应的 dalvik bytecode。==
1.4 profile文件
profile文件:/data/misc/profiles/cur/0/com.***.home/primary.prof
每个app的profile文件都在 /data/misc/profiles/ 目录下。==profile文件用来记录运行比较频繁的代码,用来进行 profile-guide 编译,使得 dex2oat编译代码更精准。==
profile的创建:
App安装的过程中,会调用到 isntalld的 create_app_data()函数,
如果当前支持profile编译,则会为app创建 profile文件。
int create_app_data(const char *uuid, const char *pkgname, userid_t userid, int flags,
        appid_t appid, const char* seinfo, int target_sdk_version) {
      ...
      if (property_get_bool("dalvik.vm.usejitprofiles")) {
            std::string profile_file = create_primary_profile(profile_path);//组织 profile文件所在路径
            if (fs_prepare_file_strict(profile_file.c_str(), 0600, uid, uid) != 0) {//在这里创建 profile文件,且只对owner Read-Write
                return -1;
            }
       ...
      }
}
- profile信息的收集:
- 在App启动的时候,开启profile的收集线程:
->ActivityThread.main()
->...
->ActivityThread.performLaunchActivity()
->ActivityClientRecord.packageInfo.getClassLoader()
->LoadedApk.getClassLoader()
->setupJitProfileSupport()
VMRuntime.registerAppInfo(profileName)
Runtime::RegisterAppInfo(profileName)
jit_-> StartProfileSaver(profileName)
ProfileSaver::Start(profilName)//在这里会创建一个thread 用来收集 resolved class与method

ProfileSaver::Run() {
FetchAndCacheResolvedClassesAndMethods();
bool profile_saved_to_disk = ProcessProfilingInfo(&new_methods); // 在这个方法中会把达到条件的 methodId 和 classid记录到 profile文件
}
void ProfileSaver::FetchAndCacheResolvedClassesAndMethods() {
  std::set<DexCacheResolvedClasses> resolved_classes = class_linker->GetResolvedClasses(/*ignore boot classes*/ true);
  std::vector<MethodReference> methods;
  {
    ScopedTrace trace2("Get hot methods");
    GetMethodsVisitor visitor(&methods);
    ScopedObjectAccess soa(Thread::Current());
    class_linker->VisitClasses(&visitor);
  }
  for (const auto& it : tracked_dex_base_locations_) {
    for (const MethodReference& ref : methods) {
      if (locations.find(ref.dex_file->GetBaseLocation()) != locations.end()) {
        methods_for_location.push_back(ref);
      }
    }
    for (const DexCacheResolvedClasses& classes : resolved_classes) {
      if (locations.find(classes.GetBaseLocation()) != locations.end()) {
        resolved_classes_for_location.insert(classes);
      }
    }
    ProfileCompilationInfo* info = GetCachedProfiledInfo(filename);
    info->AddMethodsAndClasses(methods_for_location, resolved_classes_for_location);
  }
}
在这个方法中,会编译当前进程中所有已经Load的Class,如果这些class是apk中的class,则将会被添加到 profile信息中。
对于要记录的 method则需要达到一定的条件(函数的调用次数):
函数调用次数有以下几个 threshold:
uint16_t hot_method_threshold_;
uint16_t warm_method_threshold_;
uint16_t osr_method_threshold_;
// Minimum number of JIT samples during launch to include a method into the profile.
static constexpr const size_t kStartupMethodSamples = 1;
 uint16_t GetCounter() const { // 获取当前函数被interpreter调用过的次数
   return hotness_count_;
 }
 void SetCounter(int16_t hotness_count) {
   hotness_count_ = hotness_count;
 }
 // The hotness we measure for this method. Managed by the interpreter. Not atomic, as we allow
 // missing increments: if the method is hot, we will see it eventually.
 uint16_t hotness_count_;
class GetMethodsVisitor : public ClassVisitor {
 virtual bool operator()(mirror::Class* klass) SHARED_REQUIRES(Locks::mutator_lock_) {
   if (Runtime::Current()->GetHeap()->ObjectIsInBootImageSpace(klass)) { // 属于 bootimage中的class,不对其method进行收集
     return true;
   }
   for (ArtMethod& method : klass->GetMethods(sizeof(void*))) { // 编译class的所有 method
     if (!method.IsNative()) { //  jni method 不需要收集
       if (method.GetCounter() >= kStartupMethodSamples ||  // 当前method曾经被添加到 JIT Sample中
           method.GetProfilingInfo(sizeof(void*)) != nullptr) { // 为当前method 创建过 ProfileInfo信息,当函数的调用次数,从小于warm_method_threshold_,增加到 大于等于 warm_method_threshold_时,会为method创建profile信息
         // Have samples, add to profile.
         const DexFile* dex_file = method.GetInterfaceMethodIfProxy(sizeof(void*))->GetDexFile();
         methods_->push_back(MethodReference(dex_file, method.GetDexMethodIndex())); // 达到条件,把当前method 放要准备记录到 profile中的 methods_ 集合中
       }
     }
   }
   return true;
 }
}
另外可以看到在这里,只过滤了 Bootimage 中的class,而没有过滤第三方的 class,比如 use-library 包含的class,也就是说,除了bootimage 中的 class 外,其他的 class 的 method(比如use-library中对应的class)只要调用次数达到限制,都会被记录到 profile中;
method的调用次数修改和Method profile信息添加如下都在如下函数中:
void Jit::AddSamples(Thread* self, ArtMethod* method, uint16_t count, bool with_backedges) {
  int32_t starting_count = method->GetCounter();
  int32_t new_count = starting_count + count; // 把method 调用次数增加 count
 if (starting_count < warm_method_threshold_) {
    if ((new_count >= warm_method_threshold_) &&
        (method->GetProfilingInfo(sizeof(void*)) == nullptr)) {
      bool success = ProfilingInfo::Create(self, method, /* retry_allocation */ false); // 在这里会把新创建的 profileInfo设置到 method中
      if (success) {
        VLOG(jit) << "Start profiling " << PrettyMethod(method);
      }
      if (thread_pool_ == nullptr) {
        DCHECK(Runtime::Current()->IsShuttingDown(self));
        return;
      }
      if (!success) {
        thread_pool_->AddTask(self, new JitCompileTask(method, JitCompileTask::kAllocateProfile));// 如果上面一步失败,则会在Task中调用 ProfilingInfo::Create(),把新创建的 profileInfo设置到 method中
      }
    }
    new_count = std::min(new_count, hot_method_threshold_ - 1);
  } else if (use_jit_compilation_) {
    if (starting_count < hot_method_threshold_) {
      if ((new_count >= hot_method_threshold_) &&
          !code_cache_->ContainsPc(method->GetEntryPointFromQuickCompiledCode())) {
        DCHECK(thread_pool_ != nullptr);
        thread_pool_->AddTask(self, new JitCompileTask(method, JitCompileTask::kCompile));
      }
      new_count = std::min(new_count, osr_method_threshold_ - 1);
    } else if (starting_count < osr_method_threshold_) {
      if (!with_backedges) {
        return;
      }
      if ((new_count >= osr_method_threshold_) &&  !code_cache_->IsOsrCompiled(method)) {
        thread_pool_->AddTask(self, new JitCompileTask(method, JitCompileTask::kCompileOsr));
      }
    }
  }

  // Update hotness counter
  method->SetCounter(new_count); // 把新的调用次数设置到该函数中
}
bool ProfilingInfo::Create(Thread* self, ArtMethod* method, bool retry_allocation) {
  ...
  jit::JitCodeCache* code_cache = Runtime::Current()->GetJit()->GetCodeCache();
  return code_cache->AddProfilingInfo(self, method, entries, retry_allocation) != nullptr;
}

ProfilingInfo* JitCodeCache::AddProfilingInfo(Thread* self,
                                              ArtMethod* method,
                                              const std::vector<uint32_t>& entries,
                                              bool retry_allocation) {
      info = AddProfilingInfoInternal(self, method, entries);
      ...
}

ProfilingInfo* JitCodeCache::AddProfilingInfoInternal(Thread* self ATTRIBUTE_UNUSED,
                                                      ArtMethod* method,
                                                      const std::vector<uint32_t>& entries) {
  ...
  info = new (data) ProfilingInfo(method, entries);
  method->SetProfilingInfo(info);
  profiling_infos_.push_back(info);
}
在解释执行一个函数时,会调用 AddSamples函数,从而会记录函数的调用次数。从而生成profile文件。生成的profile文件格式如下:
profile文件格式:
/**
 * Serialization format:
 *    magic,version,number_of_lines
 *    dex_location1,number_of_methods1,number_of_classes1,dex_location_checksum1, \
 *        method_id11,method_id12...,class_id1,class_id2...
 *    dex_location2,number_of_methods2,number_of_classes2,dex_location_checksum2, \
 *        method_id21,method_id22...,,class_id1,class_id2...
 *    .....
 **/
profile文件 的查看:
xxxx:/data/misc/profiles/cur/0/com.***.home # profman --profile-file=primary.prof --dump-only
=== profile ===
ProfileInfo:
XXXHome.apk
    methods: 1824,1837,1843,1846,1907,1908,1912,1916,1933,1961,1971,1980,1981,1986,2009,2041,2043,2045,2049,2066,2070,2089,2091,2093,2095,2103,2105,2107,2109,2114,2115,2149,2150,2151,2167,2197,2214,2216,2221,2233,2234,2239,2277,2278,2287,2290,2293,2301,2302,2316,2330,2342,2348,2356,2358,2377,2378,2379,2383,2391,2396,2400,2405,2407,2409,2429,2430,2458,2471,2484,2487,2490,2495,2496,2497,2498,2499,2500,2501,2502,2503,2504,2505,2510,2511,2512,2514,2517,2527,2528,2529,2533,2534,2535,2536,2537,2538,2542,2543,2544,2545,2548,2550,2551,2553,2554,2555,2556,2560,2562,2564,2567,2574,2578,2581,2596,2616,2632,2656,2683,2684,2692,2693,2696,2797,2801,2829,2878,2879,2884,2885,2896,2898,2901,2911,2934,2939,2943,2945,2947,2950,2989,3021,3058,3060,3062,3064,3079,3116,3153,3154,3157,3160,3162,3174,3286,3321,3381,3412,3416,3418,3430,3431,3434,3443,3444,3451,3453,3461,3462,3482,3491,3542,3582,3588,3643,3647,3650,3676,3681,3683,3687,3688,3690,3696,3704,3705,3713,3714,3715,3727,3731,3738,3749,3784,3796,3824,3838,3842,3844,3846,3848,3856,3860,3862,3863,3864,3866,3869,3870,3936,3957,3959,3972,3992,4022,4028,4034,4045,4052,4074,4117,4151,4157,4158,4159,4162,4163,4172,4174,4190,4195,4230,4237,4242,4287,4290,4291,4292,4297,4300,4305,4306,4352,4353,4367,4368,4424,4453,4465,4466,4474,4478,4479,4480,4482,4488,4497,4499,4501,4510,4532,4537,4538,4540,4560,4563,4573,4579,4580,4583,4588,4593,4596,4605,4608,4611,4630,4631,4632,4634,4650,4722,4742,4745,4765,4769,4774,4786,4794,4811,4813,4814,4816,4821,4822,4859,4860,4875,4891,4921,4924,4925,4933,4947,4952,4977,4986,4987,4988,4989,5014,5015,5019,5020,5022,5024,5040,5060,5061,5065,5072,5073,5074,5075,5081,5087,5097,5098,5106,5108,5124,5127,5129,5141,5142,5143,5152,5153,5161,5178,5180,5185,5186,5191,5192,5195,5196,5198,5199,5201,5202,5203,5204,5206,5208,5224,5225,5226,5229,5251,5252,5255,5281,5290,5310,5322,5325,5330,5331,5342,5351,5371,5375,5380,5382,5387,5391,5432,5433,5438,5461,5462,5465,5466,5469,5471,5486,5488,5505,5506,5514,5530,5532,5536,5537,5560,5561,5574,5592,5618,5619,5638,5663,5665,5700,5715,5721,5752,5771,5779,5784,5788,5790,5796,5799,5808,5809,5814,5815,5817,5825,5830,5839,5842,5850,5853,5855,5857,5858,5869,5888,5890,5902,5911,5929,5931,5933,5937,5964,5965,5971,5983,5986,5987,5988,5989,6039,6041,6066,6070,6089,6159,6162,6163,6165,6167,6169,6171,6183,6184,6240,6245,6248,6254,6255,6256,6277,6278,6282,6283,6285,6287,6288,6289,6291,6297,6298,6300,6302,6304,6311,6312,6319,6364,6379,6384,6402,6404,6406,6453,6517,6531,6533,6534,6536,6542,6548,6551,6743,6776,6778,6779,6780,6781,6783,6785,6786,6788,6796,6948,6951,6953,6955,6957,6960,6964,6967,6971,6974,6975,6978,6979,6980,6981,7368,7370,7374,7375,7558,7563,7612,7613,7614,7637,7638,7640,7641,7642,7643,7644,7648,7649,8235,8895,8896,8897,8900,8901,8902,8905,8910,8916,8919,8924,8972,8973,8974,8976,
    classes: 62,63,64,68,69,74,75,77,79,83,86,88,89,90,91,92,93,94,95,96,97,101,102,103,104,107,108,109,110,111,112,113,114,115,120,121,124,125,126,128,129,130,131,132,136,137,138,139,142,143,145,146,147,155,157,158,165,166,167,174,175,176,177,178,179,183,184,185,186,187,188,193,194,195,196,197,201,202,203,208,229,231,232,233,235,236,237,238,240,243,257,272,275,287,294,295,296,297,298,301,303,304,305,306,307,308,309,310,314,315,336,337,357,359,361,364,365,366,367,369,371,372,373,375,376,378,379,380,382,386,387,388,392,395,397,398,401,402,403,404,405,416,422,423,426,427,428,430,433,434,440,444,450,451,452,457,458,459,460,467,468,469,470,471,472,473,474,481,482,483,484,485,486,487,488,491,492,501,502,503,504,513,521,522,543,544,545,558,559,619,642,650,654,754,755,
其中:
XXXHome.apk表示 dex文件的位置,如果这个apk中有多个dex,比如 classes.dex 和 classes2.dex,则classes2.dex中的类,则以 XXXHome.apk:classes2.dex 命名。
methods 和 classes 后面的数据,表示他们在dex文件中的index。
我们使用profile模式 dex2oat编译时,会只编译profile中记录的这些 class 和 methods。
1.5 App-image 文件
/data/app/com.facebook.katana-1/oat/arm/base.art
/data/app/com.facebook.katana-1/oat/arm/base.odex
base.art就是对应的 app-image文件。
xxx:/data/dalvik-cache/arm # oatdump --app-image=system@priv-app@Browser@Browser.apk@classes.art --app-oat=system@priv-app@Browser@Browser.apk@classes.dex --image=/system/framework/boot.art --instruction-set=arm --header-only
获取完整数据可以把 header-only 参数去掉即可。
base.art文件主要记录已经编译好的类的具体信息以及函数在oat文件的位置,相当于缓存,在app运行的时候会加载到虚拟机,可以加快启动速度。
文件格式总结:
- java .class 文件,JVM执行的文件,Android平台上,只在编译过程中出现,不会直接使用在虚拟机中
- dex 文件,dalvik/ART执行的文件,由 java .class文件 “打包”而来
- odex 文件,odex 文件没有在这里介绍,这个是dalvik dexopt的产物,只有 Android4.4及以前的设备使用
- oat 文件,ART执行的文件,Android5.0 之后开始出现,里面包含 dex 文件,native code等信息,由 dex文件经过 dex2oat 编译而生成
- profile文件,Android7.0之后,ART使用的文件,用来进行 profile-guide编译,即指导 dex2oat 如何编译 dex文件
- app-image 文件,Android7.0之后,ART使用的文件,它是App使用的类以及函数数据的缓存,在app启动的使用mmap到内存空间,以加快app启动速度,App启动过程越复杂,使用app-image时的提升越明显
2. dex2oat 是什么
dex2oat是一个可执行程序,在手机的 /system/bin/dex2oat,它的作用是编译dex文件,生成oat文件。
在1.3节中,dex文件被编译为 oat文件的过程,就是由 /system/bin/dex2oat 程序触发的; 而实际上编译业务是在 libart-compiler.so中做的。
dex2oat(dex文件) => oat文件
其输入是dex文件,包括包含dex文件的 zip文件/apk文件/jar文件,输出就是 oat文件。
在Android7.0上,dex2oat的参数 compiler-filter 被指定为 profile类型的几个compiler-filter之一时,dex2oat还会生成 app-image文件。
所以 dex2oat(dex文件) => oat文件/image文件
在编译的过程:
依次编译输入参数中的所有dex文件; 每个dex文件又按照单个class进行编译; 对于每个class,依次编译其除 abstract 函数之外的所有函数,包括 native(jni)/static/及一般函数,进行生成native code,并存放在compiler中。
当编译完成后,会从compiler中把native code, dex文件,以及必要的组织信息,写入到OAT文件中;如果指定了生成app-image,还会再生成一份 app-image文件。
我们知道 dex文件中的函数,是 dalvik bytecode ,所以 dex2oat编译函数的过程,就是把 dalvik bytecode 转换成 native code的过程。
3. dex2oat 什么时候被触发
dex2oat进程的启动,可以分为两大类:一类是 installd进程触发的dex2oat;另一类是由 app中直接调用的 dex2oat。
installd 中触发的 dex2oat,有以下几个场景:
1.应用安装,(包括普通安装和通过shellCmd安装),安装一个app时,安装过程中需要编译dex文件,会通知installd来触发一个dex2oat进程;
2.开机扫描,开机过程中,PMS扫描已安装app过程,判断需要优化时,则会对install发出通知;
3.BackgroundDexOptService,(空闲时段或者开机之后触发的Backgroud的 Job),会通知installd进行dex2oat;
4.OTADexoptService,好象是OAT过程中的触发的,这个场景没有进行过实际的验证;
app中调用 dex2oat:
一般是App的进程fork出一个子进程,子进程用来执行dex2oat,编译相关的dex,而父进程进行 waitpid 等待,等待完成后再运行其他逻辑。
- 比如:
- 1.微信安装后的首次启动,是有dex2oat的调用
- 2.淘宝安装后的首次搜索,也有dex2oat的调用
这个也是其首次启动或者搜索的一个耗时点。
举个 BackgroudDexOptService触发 profile类型的dex2oat的例子。
BackgroudDexOptService.java文件中,
private boolean runIdleOptimization(){
...
pm.performDexOpt(pkg, /* checkProfiles */ true, PackageManagerService.REASON_BACKGROUND_DEXOPT, /* force */ false)
...
}
performDexOptTraced(packageName, checkProfiles, getCompilerFilterForReason(compileReason), force);
compileReason有以下几种类型:
xx@1:~/source/7.0/xxx-n-dev$ adb shell getprop | grep dexopt
[pm.dexopt.ab-ota]: [speed-profile]
[pm.dexopt.bg-dexopt]: [speed-profile]
[pm.dexopt.boot]: [interpret-only]
[pm.dexopt.core-app]: [speed]
[pm.dexopt.first-boot]: [interpret-only]
[pm.dexopt.forced-dexopt]: [speed]
[pm.dexopt.install]: [interpret-only]
[pm.dexopt.nsys-library]: [speed]
[pm.dexopt.shared-apk]: [speed]
当BackgroudDexOptService 启动空闲优化时,REASON_BACKGROUND_DEXOPT 对应的 compiler-filter 是 [speed-profile]。
其参数 dexopt_flags:
/* all known values for dexopt flags */
     * **************************************************************************/
    /** Application should be visible to everyone */
    public static final int DEXOPT_PUBLIC         = 1 << 1;
    /** Application wants to run in VM safe mode */
    public static final int DEXOPT_SAFEMODE       = 1 << 2;//
    /** Application wants to allow debugging of its code */
    public static final int DEXOPT_DEBUGGABLE     = 1 << 3;
    /** The system boot has finished */
    public static final int DEXOPT_BOOTCOMPLETE   = 1 << 4;
    /** Hint that the dexopt type is profile-guided. */
    public static final int DEXOPT_PROFILE_GUIDED = 1 << 5;
    /** This is an OTA update dexopt */
    public static final int DEXOPT_OTA            = 1 << 6;
performDexOptTraced 会调用到 PackageDexOptimizer.java中 如下方法:
private int performDexOptLI(PackageParser.Package pkg, String[] sharedLibraries,
            String[] targetInstructionSets, boolean checkProfiles, String targetCompilerFilter, int extraFlags) {
参数 sharedLibraries 表示 app使用的 use-library: application标签下的
另外会在这个方法中构建 dexopt_flags,最终传递给installd:
boolean isProfileGuidedFilter = DexFile.isProfileGuidedCompilerFilter(targetCompilerFilter);
final boolean vmSafeMode = (pkg.applicationInfo.flags & ApplicationInfo.FLAG_VM_SAFE_MODE) != 0;
final boolean debuggable = (pkg.applicationInfo.flags & ApplicationInfo.FLAG_DEBUGGABLE) != 0;
final boolean isPublic = !pkg.isForwardLocked() && !isProfileGuidedFilter;
final int profileFlag = isProfileGuidedFilter ? DEXOPT_PROFILE_GUIDED : 0;
final int dexFlags = adjustDexoptFlags(
                        ( isPublic ? DEXOPT_PUBLIC : 0)
                        | (vmSafeMode ? DEXOPT_SAFEMODE : 0)
                        | (debuggable ? DEXOPT_DEBUGGABLE : 0)
                        | profileFlag
                        | DEXOPT_BOOTCOMPLETE);
只有如下返回true的几种类型作为 profileGuidedFilter:
switch (filter) {
    case CompilerFilter::kVerifyNone:
    case CompilerFilter::kVerifyAtRuntime:
    case CompilerFilter::kInterpretOnly:
    case CompilerFilter::kSpace:
    case CompilerFilter::kBalanced:
    case CompilerFilter::kTime:
    case CompilerFilter::kSpeed:
    case CompilerFilter::kEverything: return false;

    case CompilerFilter::kVerifyProfile:
    case CompilerFilter::kSpaceProfile:
    case CompilerFilter::kSpeedProfile:
    case CompilerFilter::kEverythingProfile: return true;
  }
其最终调用到通知 installd的 dexopt_delegate() 方法进行dex2oat;
int dexopt_delegate(const char* apk_path, uid_t uid, const char* pkgname, const char* instruction_set,
           int dexopt_needed, const char* oat_dir, int dexopt_flags, const char* compiler_filter,
           const char* volume_uuid ATTRIBUTE_UNUSED, const char* shared_libraries, int extra_flags)
在installd中会把 dexopt_flags 拆解出来进行使用。
bool is_public = ((dexopt_flags & DEXOPT_PUBLIC) != 0);
bool vm_safe_mode = (dexopt_flags & DEXOPT_SAFEMODE) != 0;
bool debuggable = (dexopt_flags & DEXOPT_DEBUGGABLE) != 0;
bool boot_complete = (dexopt_flags & DEXOPT_BOOTCOMPLETE) != 0;
bool profile_guided = (dexopt_flags & DEXOPT_PROFILE_GUIDED) != 0;
当进行profile类型的 dex2oat时,会同时给app生成 app-image
add_extension_to_file_name(image_path, ".art")
      if (profile_guided && have_app_image_format) {
          image_fd = open_output_file(image_path, /*recreate*/true, /*permissions*/0600);
          if (image_fd < 0) {
              ALOGE("installd could not create '%s' for image file during dexopt\n", image_path);
          } else if (!set_permissions_and_ownership(image_fd, is_public, uid, image_path)) {
              image_fd = -1;
          }
      }
之后会 fork一个新的进程,进行run_dex2oat, 组织dex2oat的参数并调用 /system/bin/dex2oat程序执行。
在run_dex2oat()方法中,有可能还会重新修改 compiler-filter:
 if (skip_compilation) {
    strcpy(dex2oat_compiler_filter_arg, "--compiler-filter=verify-none");
    have_dex2oat_compiler_filter_flag = true;
    have_dex2oat_relocation_skip_flag = true;
} else if (vm_safe_mode) {
    strcpy(dex2oat_compiler_filter_arg, "--compiler-filter=interpret-only");
    have_dex2oat_compiler_filter_flag = true;
} else if (compiler_filter != nullptr &&
    strlen(compiler_filter) + strlen("--compiler-filter=") <
            arraysize(dex2oat_compiler_filter_arg)) {
    sprintf(dex2oat_compiler_filter_arg, "--compiler-filter=%s", compiler_filter);
    have_dex2oat_compiler_filter_flag = true;
}
且 shared_library会放在 classpath 中:
if (shared_libraries != nullptr) {
    argv[i++] = RUNTIME_ARG;
    argv[i++] = "-classpath";
    argv[i++] = RUNTIME_ARG;
    argv[i++] = shared_libraries;
}
在 run_dex2oat() 方法中组织完成 dex2oat参数后,进行执行dex2oat: execv(DEX2OAT_BIN, (char * const *)argv);
最终执行的命令类似如下:
dex2oat --dex-file=/data/app/com.facebook.katana-1/base.apk --app-image-file=/data/app/com.facebook.katana-1/oat/arm/base.art --oat-file=/data/app/com.facebook.katana-1/oat/arm/base.odex --instruction-set=arm --instruction-set-variant=kryo --instruction-set-features=default --runtime-arg -Xms64m --runtime-arg -Xmx512m --compiler-filter=interpret-only --image-format=lz4 --runtime-arg -classpath --runtime-arg /system/framework/com.google.android.maps.jar
这个是手动模拟的,文件的参数都是路径,真正运行的时候, 文件一般是打开后,传递 fd 给 dex2oat。
这个命令表示,要进行dex2oat,且创建 app对应的 app-image (--app-image-file),编译时使用 interpret-only的模式,该应用使用 library :com.google.android.maps.jar
从前面,我们知道只有profile-guided compiler-filter时才会创建 app-image,而当前这个命令是 interpret-only 与 app-image的组合,所以,可能在installd中,先创建了app-image之后,又修改了compiler-filter的类型。
总结:
- 由系统触发的dex2oat,都是通过通知installd来进行编译业务
- 由应用触发的dex2oat,一般都是自行构建参数,直接调用dex2oat
4. dex2oat生成 oat文件和app-image文件
dex2oat --dex-file=/data/app/com.facebook.katana-1/base.apk --app-image-file=/data/app/com.facebook.katana-1/oat/arm/base.art --oat-file=/data/app/com.facebook.katana-1/oat/arm/base.odex --instruction-set=arm --instruction-set-variant=kryo --instruction-set-features=default --runtime-arg -Xms64m --runtime-arg -Xmx512m --compiler-filter=interpret-only --image-format=lz4 --runtime-arg -classpath --runtime-arg /system/framework/com.google.android.maps.jar
4.1 dex2oat 主要流程
- dex2oat main函数:
int main(int argc, char** argv) {
  int result = art::dex2oat(argc, argv);
...
}
static int dex2oat(int argc, char** argv) {
...
 dex2oat->ParseArgs(argc, argv);
  if (dex2oat->UseProfileGuidedCompilation()) {
    if (!dex2oat->LoadProfile()) {
      return EXIT_FAILURE;
    }
  }
  dex2oat->Setup();
  bool result;
  if (dex2oat->IsImage()) {
    result = CompileImage(*dex2oat);
  } else {
    result = CompileApp(*dex2oat);
  }
   ...
}
当使用profile-guide 编译app时,会先 LoadProfile(),这里就是 load /data/misc/profiles/cur/0/packagename/primary.prof,进行解析出 class index 和 method index,放到 ProfileCompilationinfo 中;
- 如果当前的编译要生成 image时,走CompileImage流程,否则走CompileApp流程;
bool IsImage() const {
    return IsAppImage() || IsBootImage();
}
- 不论是编译boot image(boot.art)或者时 app 要生成 image时都走该流程;
static int CompileApp(Dex2Oat& dex2oat) {
  dex2oat.Compile();
  if (!dex2oat.WriteOatFiles()) {
    dex2oat.EraseOatFiles();
    return EXIT_FAILURE;
  }
  ...
  if (!dex2oat.FlushCloseOatFiles()) {
    return EXIT_FAILURE;
  }
  dex2oat.DumpTiming();
  return EXIT_SUCCESS;
}
static int CompileImage(Dex2Oat& dex2oat) {
  dex2oat.LoadClassProfileDescriptors();
  dex2oat.Compile();

  if (!dex2oat.WriteOatFiles()) {
    dex2oat.EraseOatFiles();
    return EXIT_FAILURE;
  }
  ...
  // Creates the boot.art and patches the oat files.
  if (!dex2oat.HandleImage()) {
    return EXIT_FAILURE;
  }
  ...
  dex2oat.DumpTiming();
  return EXIT_SUCCESS;
}
CompileApp和CompileImage的区别是:
编译image时需要 LoadClassProfileDescriptors() 产生 image_classes_ 集合,和生成 image(HandleImage());
在生成的app image中将会包含 image_classes_ 集合中类的对象,不在 image_classes_集合中的app的类的对象,将不会被生成到 app-image中。
- LoadClassProfileDescriptors()在从 profile信息中获取 image_classes_集合时,将会把 app dex 中的类以外的类,都过滤掉,比如 classpath dex 对应的类将不会生成到 app-image;
void LoadClassProfileDescriptors() {
    if (profile_compilation_info_ != nullptr && app_image_) {
      std::set<DexCacheResolvedClasses> resolved_classes(profile_compilation_info_->GetResolvedClasses()); // 获取 profile信息中记录的所有 class
      // Filter out class path classes since we don't want to include these in the image.
      std::unordered_set<std::string> dex_files_locations;
      for (const DexFile* dex_file : dex_files_) {
        dex_files_locations.insert(dex_file->GetLocation());  // 当前app的所有dex file
      }
      for (auto it = resolved_classes.begin(); it != resolved_classes.end(); ) {
        if (dex_files_locations.find(it->GetDexLocation()) == dex_files_locations.end()) {  // 如果这个类不在当前app 的dex file中,则过滤掉
          VLOG(compiler) << "Removed profile samples for non-app dex file " << it->GetDexLocation();
          it = resolved_classes.erase(it);
        } else {
          ++it;
        }
      }
      image_classes_.reset(new std::unordered_set<std::string>(runtime->GetClassLinker()->GetClassDescriptorsForProfileKeys(resolved_classes)));
    }
  }
dex2oat流程总结:
- 根据dex2oat接收到的参数,组织编译参数
- 如果是 profile-guide 编译,则先进行 load app对应的 profile
- 收集参数中包含的所有dex file,启动 Compiler 编译这些dex file(classpath中对应的dex file,即uses-library 引用的jar文件,不会被编译),编译生成的数据放在compiler-driver中
- 使用 compiler-driver 中的数据,依据 oat文件设计的格式,组织成oat文件,嵌入到 ELF文件中
- 如果指定需要生成 app-image,则使用 HandleImage(), 生成app-image, 即 ***.art 文件
4.2 Compile 流程:
// Create and invoke the compiler driver. This will compile all the dex files.
  void Compile() {
  ...
    driver_.reset(new CompilerDriver(compiler_options_.get(),
                                     verification_results_.get(),
                                     &method_inliner_map_,
                                     compiler_kind_,
                                     instruction_set_,
                                     instruction_set_features_.get(),
                                     IsBootImage(),
                                     IsAppImage(),
                                     image_classes_.release(),
                                     compiled_classes_.release(),
                                     /* compiled_methods */ nullptr,
                                     thread_count_,
                                     dump_stats_,
                                     dump_passes_,
                                     compiler_phases_timings_.get(),
                                     swap_fd_,
                                     profile_compilation_info_.get()));
    driver_->SetDexFilesForOatFile(dex_files_);
    driver_->CompileAll(class_loader_, dex_files_, timings_);
  }
编译dex文件时在 CompilerDriver 中完成, 其中LoadProfile时构造的 profile_compilation_info_也会指导 将要编译哪些class和 methods。
driver_->SetDexFilesForOatFile(dex_files_);//表示将要编译的所有 dex file,这个集合是 --dex-file=/data/app/com.facebook.katana-1/base.apk 这个文件中包含的所有dex文件,比如facebook的apk中有 12个 dex文件,则会依次编译这12个文件。
void CompilerDriver::CompileAll(jobject class_loader,
                                const std::vector<const DexFile*>& dex_files,
                                TimingLogger* timings) {
  InitializeThreadPools();
  // Precompile:
  // 1) Load image classes
  // 2) Resolve all classes
  // 3) Attempt to verify all classes
  // 4) Attempt to initialize image classes, and trivially initialized classes
  PreCompile(class_loader, dex_files, timings);
  // Compile:
  // 1) Compile all classes and methods enabled for compilation.
  if (!GetCompilerOptions().VerifyAtRuntime()) {
    Compile(class_loader, dex_files, timings);
  }
}

void CompilerDriver::PreCompile(jobject class_loader,
                                const std::vector<const DexFile*>& dex_files,
                                TimingLogger* timings) {
   LoadImageClasses(timings); //这里只针对 bootimage的编译
   Resolve(class_loader, dex_files, timings);
  Verify(class_loader, dex_files, timings);
  InitializeClasses(class_loader, dex_files, timings);
}

void CompilerDriver::Verify(jobject class_loader,
                            const std::vector<const DexFile*>& dex_files,
                            TimingLogger* timings) {
  for (const DexFile* dex_file : dex_files) {
    CHECK(dex_file != nullptr);
    VerifyDexFile(class_loader,
                  *dex_file,
                  dex_files,
                  parallel_thread_pool_.get(),
                  parallel_thread_count_,
                  timings);
  }
}

void CompilerDriver::VerifyDexFile(...){
  ...
  VerifyClassVisitor visitor(&context, log_level);
  context.ForAll(0, dex_file.NumClassDefs(), &visitor, thread_count);
}

class VerifyClassVisitor : public CompilationVisitor {
 public:
  VerifyClassVisitor(const ParallelCompilationManager* manager, LogSeverity log_level)
     : manager_(manager), log_level_(log_level) {}
  virtual void Visit(size_t class_def_index) REQUIRES(!Locks::mutator_lock_) OVERRIDE {
    if (!manager_->GetCompiler()->ShouldVerifyClassBasedOnProfile(dex_file, class_def_index)) {
      // Skip verification since the class is not in the profile.
      return;
    }
    ...
  }
}

bool CompilerDriver::ShouldVerifyClassBasedOnProfile(const DexFile& dex_file,
                                                     uint16_t class_idx) const {
  ...
  bool result = profile_compilation_info_->ContainsClass(dex_file, class_idx);
  return result;
}
在这里可以看到,前面从 profile中load出来的信息,将会决定只有这些 class才会进行Verify。
接下来看下真正的编译,实际上编译对应的是 dalvik bytecode到 native code的转换,主要针对的 method;
void CompilerDriver::Compile(jobject class_loader,
                             const std::vector<const DexFile*>& dex_files,
                             TimingLogger* timings) {
  for (const DexFile* dex_file : dex_files) {
    CHECK(dex_file != nullptr);
    CompileDexFile(class_loader, *dex_file, dex_files, parallel_thread_pool_.get(), parallel_thread_count_, timings); // 按照dexfile 依次编译
  }
  ...
}
void CompilerDriver::CompileDexFile(jobject class_loader,
                                    const DexFile& dex_file,
                                    const std::vector<const DexFile*>& dex_files,
                                    ThreadPool* thread_pool,
                                    size_t thread_count,
                                    TimingLogger* timings) {
  TimingLogger::ScopedTiming t("Compile Dex File", timings);
  ParallelCompilationManager context(Runtime::Current()->GetClassLinker(), class_loader, this,
                                     &dex_file, dex_files, thread_pool);
  CompileClassVisitor visitor(&context);
  context.ForAll(0, dex_file.NumClassDefs(), &visitor, thread_count); //从dexfile的第一个class,直到最后一个class
}
编译的工作在 CompileClassVisitor 的Visit方法中进行;
class CompileClassVisitor : public CompilationVisitor {
 public:
  explicit CompileClassVisitor(const ParallelCompilationManager* manager) : manager_(manager) {}
  virtual void Visit(size_t class_def_index) REQUIRES(!Locks::mutator_lock_) OVERRIDE { // 传递的参数为 class在 dexfile中的 index,以此来查找class 数据
    const DexFile::ClassDef& class_def = dex_file.GetClassDef(class_def_index);
    const char* descriptor = dex_file.GetClassDescriptor(class_def);
    Handle<mirror::Class> klass(hs.NewHandle(class_linker->FindClass(soa.Self(), descriptor, class_loader)));
    const uint8_t* class_data = dex_file.GetClassData(class_def);
    ClassDataItemIterator it(dex_file, class_data);

    while (it.HasNextDirectMethod()) { // 编译direct mothod
      uint32_t method_idx = it.GetMemberIndex();
      CompileMethod(soa.Self(), driver, it.GetMethodCodeItem(), it.GetMethodAccessFlags(),
                    it.GetMethodInvokeType(class_def), class_def_index,
                    method_idx, jclass_loader, dex_file, dex_to_dex_compilation_level,
                    compilation_enabled, dex_cache);
      it.Next();
    }
    while (it.HasNextVirtualMethod()) { // 编译virtual methods
      uint32_t method_idx = it.GetMemberIndex();
      CompileMethod(soa.Self(), driver, it.GetMethodCodeItem(), it.GetMethodAccessFlags(),
                    it.GetMethodInvokeType(class_def), class_def_index,
                    method_idx, jclass_loader, dex_file, dex_to_dex_compilation_level,
                    compilation_enabled, dex_cache);
      it.Next();
    }
    ...
  }
}
从这一步中,我们可以看到,编译代码工作,主要的就是编译 method成为 native code;
static void CompileMethod(Thread* self,
                          CompilerDriver* driver,
                          const DexFile::CodeItem* code_item,
                          uint32_t access_flags,
                          InvokeType invoke_type,
                          uint16_t class_def_idx,
                          uint32_t method_idx,
                          jobject class_loader,
                          const DexFile& dex_file,
                          optimizer::DexToDexCompilationLevel dex_to_dex_compilation_level,
                          bool compilation_enabled,
                          Handle<mirror::DexCache> dex_cache)
    REQUIRES(!driver->compiled_methods_lock_) {
    MethodReference method_ref(&dex_file, method_idx);
    if ((access_flags & kAccNative) != 0) { // 编译 JNI 函数
      compiled_method = driver->GetCompiler()->JniCompile(access_flags, method_idx, dex_file);
    } else if((access_flags & kAccAbstract) != 0) { // abstract 函数没有代码,不需要编译
    } else { //编译其他函数
    const VerifiedMethod* verified_method =
        driver->GetVerificationResults()->GetVerifiedMethod(method_ref);
    bool compile = compilation_enabled &&
        driver->GetVerificationResults()
            ->IsCandidateForCompilation(method_ref, access_flags) &&
        verified_method != nullptr &&
        !verified_method->HasRuntimeThrow() &&
        (verified_method->GetEncounteredVerificationFailures() &
            (verifier::VERIFY_ERROR_FORCE_INTERPRETER | verifier::VERIFY_ERROR_LOCKING)) == 0 &&
        driver->IsMethodToCompile(method_ref) &&
        driver->ShouldCompileBasedOnProfile(method_ref);// 如果是profile-guide编译,需要检查是否是 profile中指定的函数,如果不是,则不编译该函数
    if (compile) {
      // NOTE: if compiler declines to compile this method, it will return null.
      compiled_method = driver->GetCompiler()->Compile(code_item, access_flags, invoke_type,
                                                       class_def_idx, method_idx, class_loader,
                                                       dex_file, dex_cache);
    }
    ...
    driver->AddCompiledMethod(method_ref, compiled_method, non_relative_linker_patch_count);//把编译得到的 compiled-method 添加到 compiler-driver中,以便后面生成oat文件时使用
    }
}
compiled-method 的生成过程,是真正ART编译器工作的过程,使用了图等算法进行编译,非常复杂,这里不再详述,
总之,这个过程中,完成了dalvik bytecode 到 native code的转化以及一定的优化,到这一步,我们得到了产出: compiled-method
ART运行过程中,执行函数时,如果这个函数被编译过,那么就会执行其对应的 compiled-method,否则继续解释执行其对应的 dalvik bytecode。
bool CompilerDriver::ShouldCompileBasedOnProfile(const MethodReference& method_ref) const {
  if (profile_compilation_info_ == nullptr) {
    // If we miss profile information it means that we don't do a profile guided compilation.
    // Return true, and let the other filters decide if the method should be compiled.
    return true;
  }
  bool result = profile_compilation_info_->ContainsMethod(method_ref);// 判断当前method是不是在前面 load到的 profile 中
  return result;
}
Compile流程总结:
- PreCompile 做一些准备工作,ResolveClass(可以认为是从dex文件中构造class到内存中),VerifyClass(验证错误),InitializeClass(初始化)等动作,做一些过滤动作,比如把verify失败的class过滤掉
- Compile过程,多线程编译,线程数目是 CPU count -1, 最小编译单位是 method,依次按照method所在 dex,所在class进行编译
- 如果存在profile的情况下,Verify过程只对profile中存在的Class进行verify,CompileMethod过程,只对profile中存在的method进行编译
- 编译后生成的compiled-method 放到 compiler-driver中,以备在dex2oat中,准备写入OAT文件时使用
4.3 OAT 文件写入流程
在Compile流程结束后,会进行OAT文件的写入操作。
enum class WriteState {
    kAddingDexFileSources, // 添加dex文件到 oat文件中
    kPrepareLayout, //准备文件布局
    kWriteRoData, //写入RoData
    kWriteText, //写入代码段
    kWriteHeader, // 写入 oat header
    kDone // 写入完成
  };
从OatWriteState可以看到,其写入oat文件的流程。
- AddDexFileSource,在dex2oat Setup时,就已经将将要编译的dex file 写入到 OatWriter 中,并设置 write_state_ = WriteState::kPrepareLayout;
- 后续的步骤都在编译完成后,由 WriteOatFiles 完成
- kPrepareLayout,初始化 OatClass,OatMaps,OatCode, 准备OatMethod信息 和 bss段的DexCacheArray
- kWriteRoData,写入 readOnly 数据,依次写入 ClassOffset,写入 OatClass,写入函数的vmap Table,写入 padding
- kWriteText,对于要生成 bootimage时,写入trampoline,对与app只写入quick code
- kWriteHeader,填充 Oat Header信息,写入到oat文件
bool Setup() {
    CreateOatWriters();
    if (!AddDexFileSources()) {
      return false;
    }
 }

bool WriteOatFiles() {
  if (IsImage()) { // 如果本次dex2oat要生成 image,则会在写入 oat文件时,做准备工作
    image_writer_.reset(new ImageWriter(*driver_, image_base_, compiler_options_->GetCompilePic(),IsAppImage(), image_storage_mode_, oat_filenames_, dex_file_oat_index_map_));
    if (!image_writer_->PrepareImageAddressSpace()) {
      LOG(ERROR) << "Failed to prepare image address space.";
      return false;
    }
  }
  oat_writer->PrepareLayout(driver_.get(), image_writer_.get(), dex_files, &patcher);
  size_t rodata_size = oat_writer->GetOatHeader().GetExecutableOffset();
  size_t text_size = oat_writer->GetSize() - rodata_size;
  elf_writer->SetLoadedSectionSizes(rodata_size, text_size, oat_writer->GetBssSize());
  if (!oat_writer->WriteRodata(rodata)) {
    LOG(ERROR) << "Failed to write .rodata section to the ELF file " << oat_file->GetPath();
    return false;
  }
  OutputStream* text = elf_writer->StartText();
  if (!oat_writer->WriteCode(text)) {
    LOG(ERROR) << "Failed to write .text section to the ELF file " << oat_file->GetPath();
    return false;
  }
  if (!oat_writer->WriteHeader(elf_writer->GetStream(),
                               image_file_location_oat_checksum_,
                               image_file_location_oat_data_begin_,
                               image_patch_delta_)) {
    LOG(ERROR) << "Failed to write oat header to the ELF file " << oat_file->GetPath();
    return false;
  }
}
OAT文件的写入流程就是按照这几个步骤完成,可以参照oat文件的加载完成OAT文件格式的详细了解。
另外,在WriteOatFiles过程中,如果发现本次要生成image,则会提前准备 image address space:
PrepareImageAddressSpace() {
    PruneNonImageClasses();  // 把不准备添加到 app-image 中的 class 清除,比如claspath中的class,profile中记录class之外的class等
    heap->CollectGarbage(false);  // Remove garbage.这一步中回收的对象包括 上面被删除的class 引用的对象,比如该class对应的DexCache
    CalculateNewObjectOffsets();//重新计算 object offset
  if (!AllocMemory()) { // 分配内存,存放image信息
    return false;
  }
}
在 CalculateNewObjectOffsets()函数中,会计算DexCache Array在 oat中的offset,并做安全检查:
void ImageWriter::PrepareDexCacheArraySlots() {
  for (const ClassLinker::DexCacheData& data : class_linker->GetDexCachesData()) {
    mirror::DexCache* dex_cache = down_cast<mirror::DexCache*>(self->DecodeJObject(data.weak_root));
    if (dex_cache == nullptr || IsInBootImage(dex_cache)) {
      continue;
    }
    const DexFile* dex_file = dex_cache->GetDexFile();
    CHECK(dex_file_oat_index_map_.find(dex_file) != dex_file_oat_index_map_.end())  << "Dex cache should have been pruned " << dex_file->GetLocation()  << "; possibly in class path";
    DexCacheArraysLayout layout(target_ptr_size_, dex_file);
    size_t oat_index = GetOatIndexForDexCache(dex_cache);
    ImageInfo& image_info = GetImageInfo(oat_index);
    uint32_t start = image_info.dex_cache_array_starts_.Get(dex_file);
    AddDexCacheArrayRelocation(dex_cache->GetResolvedTypes(), start + layout.TypesOffset(), dex_cache);
    AddDexCacheArrayRelocation(dex_cache->GetResolvedMethods(),  start + layout.MethodsOffset(), dex_cache);
    AddDexCacheArrayRelocation(dex_cache->GetResolvedFields(),  start + layout.FieldsOffset(),  dex_cache);
    AddDexCacheArrayRelocation(dex_cache->GetStrings(), start + layout.StringsOffset(), dex_cache);
  }
}
前面提到过,只会把 App自身的 class 放到App-image中,并不包括 class path对应的dex中的 class,由于class引用自己对应的DexCache
而app自身class之外的class,在PruneNonImageClasses()被清空,所以对应的DexCache也被GC掉,此时,Runtime中存在的DexCache应该只有 app自身dex对应的DexCache;
所以这里检查当前 runtime中的所有dexcache,是否都是 dex_file_oat_index_map_中dexfile的对应,如果不是对应,则说明出问题了;
dex_file_oat_index_map_ 是在dex2oat Setup函数中填充的; 其填充的dexfile就是 dex2oat参数中传递过来的 app自身的dex文件。
5. app-image如何使用
app-image在App启动的过程中加载,加载流程如下:
->ActivityThread.main()
->...
->ActivityThread.performLaunchActivity()
->ActivityClientRecord.packageInfo.getClassLoader()
->LoadedApk.getClassLoader()
->LoadedApk.createOrUpdateClassLoaderLocked()
->ApplicationLoaders.getDefault().getClassLoader()
->new PathClassLoader()
->new BaseDexClassLoader()
->new DexPathList()
->makePathElements
->loadDexFile
->new DexFile()
->openDexFile()
->openDexFileNative
->openDexFilesFromOat()
->OpenImageSpace(source_oat_file)// 在这里尝试打开oat文件对应的image文件,
-> heap ->AddSpace(image_space);
-> class_linker ->AddImageSpace(image-space)
class_linker的 AddImageSpace中会调用 UpdateAppImageClassLoadersAndDexCaches()方法:
bool ClassLinker::UpdateAppImageClassLoadersAndDexCaches(
    ...
    ClassTable* table = InsertClassTableForClassLoader(class_loader.Get());
    for (size_t i = 0; i < num_dex_caches; i++) {
      mirror::DexCache* const dex_cache = dex_caches->Get(i);
      const DexFile* const dex_file = dex_cache->GetDexFile();
      RegisterDexFileLocked(*dex_file, hs3.NewHandle(dex_cache));
      GcRoot<mirror::Class>* const types = dex_cache->GetResolvedTypes();
      const size_t num_types = dex_cache->NumResolvedTypes();
        for (int32_t j = 0; j < static_cast<int32_t>(num_types); j++) {
          mirror::Class* klass = types[j].Read();
          if (space->HasAddress(klass)) {
            klass->SetClassLoader(class_loader.Get());
          }
          table->Insert(klass);
        }
      ...
    }
在这个函数中,会把app-image中的所有类的 classLoader更新为当前的 classLoader,并将它们添加到当前的ClassLoader的class table中;
之后在当前进程中有使用相关类时,在FindClass过程中,直接就能在 class table中找到,即可使用,免去了类的加载。
至此,app进程在后续的运行中,就可以直接使用app-image中的类了。

